Table Of Content
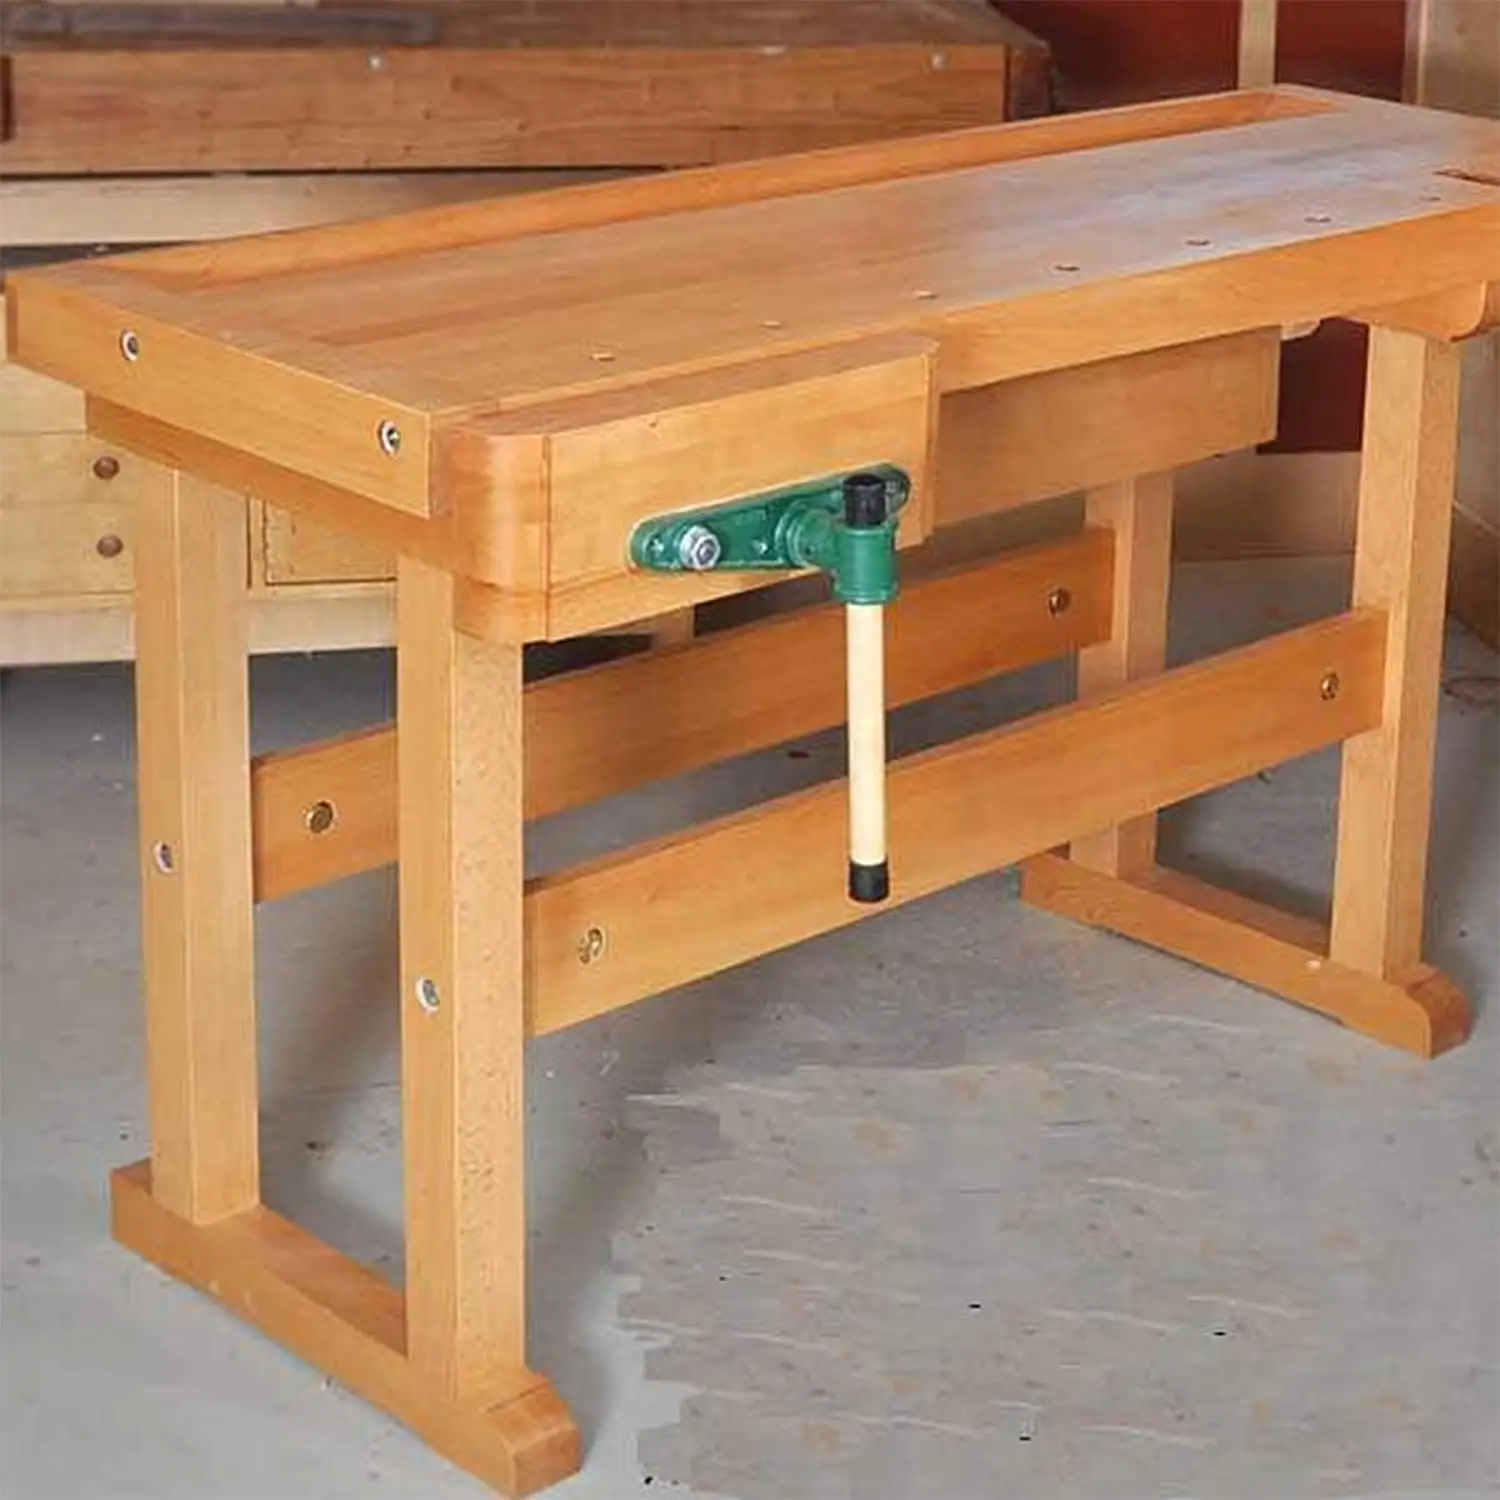
Get complete site access to video workshops, digital plans library, online archive, and more, plus the print magazine. Making a bench is a big undertaking, but fortunately most of the work involved is fairly routine. The base of this bench is four big legs joined to the rails between them with mortise-and-tenons. Shiplapped boards set between the lower rails provide a nice place for storing jigs and anything else you like to keep close by. I am going to skip over the base construction here, because the process is relatively straightforward, and focus instead on the top and the tail vise.

Step 16: Preparing the Short Stretchers
This simple and cheap workbench lives up true to itsname. On the one hand, you can have this one ready in as little as just 1 hour. In order to create this affordable workbench yourself,you will have to utilize a circular saw and planer, as well as a table saw,which is, however, optional. The first one is that it is extremely easy to make,and it doesn’t require you to have a complexly extended assemble of tools. Thesecond one comes with the fact that all the wood material you will need costsas little as $100.
Build the Projects. Master Your Hand Tools.
80 Best Dining Room Ideas and Decorating Tips - Good Housekeeping
80 Best Dining Room Ideas and Decorating Tips.
Posted: Mon, 27 Nov 2023 08:00:00 GMT [source]
If you are going to try to clean up construction lumber by hand, using a hand plane is a lot faster and more pleasant than using a belt sander. Except, of course, that to do a good job of planing a board you need a solid bench to hold the board, and you don't have a bench, yet.Me, I'm stubborn, and nearly always insist on doing things the hard way. If you have a smaller workshop or just enjoy the benefits of space-saving products, then these innovative workbench plans are a great choice. The constructed workbench provides 18 square feet of tabletop space and it sits on four lockable caster wheels. When the work is done, you can fold the legs and even hang the entire workbench on the custom wall-mount for simple, space-saving storage.
For Chris Gochnour, the tail vise is the heart of this versatile workbench.
You can easily build a heavy-duty workbench yourself with the right plans. There are many different ways that you can build a workbench, depending on your preferences and needs. If you need plenty of storage, there are options for that. If you just need a basic place to work, there are plans that are just a simple table.
Rolling workbench 6-Step DIY Guide
After about twenty minutes I checked on it and found that in the deepest spot the void wasn't entirely filled, so I mixed up another batch and added more. After that had cured for a bit I eased the top to the floor and applied a coat of oil to the bottom side. I planned on attaching the base to the top the next day, and I wanted the bottom side oiled to keep it from absorbing moisture.As I said earlier, be careful moving the top. I rigged a simple pulley system to make moving the top possible for one person.
I didn't get every one of them right.If you should drill a hole in the wrong position, if it doesn't overlap the correct position you can just ignore it. It doesn’t matter if you are looking for storage or not. Or if you are looking for a traditional style plan or something more edgy and modern to fit smaller spaces. It is built on table legs but still provides a lot of workspace. And it should be an easy enough build, considering its basic design. This project is perfect for intermediate and advanced woodworkers.
If you've got any interest in this project, then you should consider if it's right for you, because it's very specialized and its original builder had a purpose in mind when he built it. You can build this one for less than $50 and in just a few hours. Although it's made primarily from 2x4s, the legs got doubled to get the thickness of a 4x4.
The great thing about this storage bench is its raised sides, which give it a look and design that are more similar to standard sofas. The linen-like upholstery gives it a classic texture, and the legs are made of high-quality wood for superior durability. In conclusion, our guide to 40 free DIY bench plans serves as your go-to resource for making a personalized touch to your home or garden. With step-by-step instructions, we’ve covered everything from selecting the right materials and tools to providing maintenance tips and answering frequently asked questions. The 2×4 adirondack bench plan promises durability and comfort.
This workbench is super simple and requires minimal materials. It has a great amount of workspace and ample storage for tools and other odds and ends too. And it also has a great open area for storage underneath. So this workbench is really awesome because they give you a detailed materials list and detailed plans to help you with the build.
You’ll also love the integrated shelves and drawers, which make holding all your tools, materials, and other bits and bobs neater. When you combine this workbench with a few accessories, it’s quite easy to use. That said, this workbench also requires a variety of different tools, such as a speed square, a jigsaw, and a chop saw. Therefore, it may not be the best for beginners who don’t have these tools lying around. You should spend a bit over $100 on materials and then a few hours to actually build the table.
The flat side of the flipping station is then free to use as a tabletop surface. If you’ve been searching for advanced worktable plans then downloading these plans for the ultimate workbench may satisfy your need for a challenging DIY project. Build your own workbench from our step-by-step woodworking plans. If you're looking for an heirloom quality bench or an easy-to-build, DIY workbench that you can build in a weekend, you'll be sure to find the project plans to suit your needs. Plus, get storage solutions that can help you free up space in your workshop. Brandon wanted to take a hand-tools workbench to the next level.
It is meant to be built in only 4 hours and for a budget of only $70. So they literally walk you through each step of this build including falling the trees. And it has a place overhead that you can hang a shop light. That will obviously make working on this bench much more enjoyable.
But also collapse it for easy storage of the workbench. So when you need this workbench it provides an ample amount of workspace. But when you need the space more than the workbench you can fold it down to where it is only a few inches in depth. And the storage shelf it offers is great to just set your tools in their cases beneath the workbench. That obviously makes it easier to grab when you need it quickly. But what makes it even more appealing is the fact that the instructions tell you how to build it for little cost.
Rather it explains what you have to do, but still allows you the freedom to make the final choice. Corey shows you how she built each step of it, starting from the frame until she installed her clamp tracks on the bench top. What you get are lots of diagrams with detailed labeling and lists of the materials that you'll need. The goal here is to add a wooden bench top, with a vise and a magnetic toolbar for organizing your tools. You can also include a power strip underneath the top to power your tools. Bob put a lot of work into this project, and so too must you if you decide to build it.
It's affordable at $120, which includes the cost of the Simpson rigid tie connectors and 4 caster wheels. A handsaw and a drill will do for this job, although having an impact driver and a miter saw would be great. Jamison, the Rogue Engineer shows you how to make a workbench the fast and easy way. It will cost just $75 and you'll be done in less than an hour.


No comments:
Post a Comment